How to setup your own secure SMPP server
This page is about SMPP server technology. It gives you information on how to setup an SMPP server and how to use it to provide SMPP SMS service for your users and customers. If you are not familiar with SMPP, but you wish to become an SMS service provider this page is good place to start. If you are interested in securing your existing SMPP server, you might want to read the SMPPS server page.
What is an SMPP server?
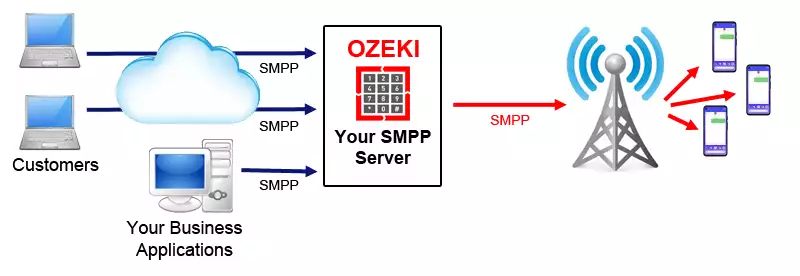
An SMPP server is a software that allows you to provide an SMS service over the Internet. An SMPP server, such as Ozeki SMS Gateway, uses the SMPP protocol to send and receive SMS text messages.
How does an SMPP server work?
An SMPP server provides sms service using the SMPP protocol. SMPP stands for Short Message Peer to Peer protocol (SMPP). It is the most popular communication standard for sending SMS messages over the Internet. SMPP is optimized for fast delivery of SMS Protocol Data Units (PDUs) in bulk.
SMPP client software installed on customer computers connect to SMPP server using a TCP/IP connection. The SMPP protocol is used to exchange messages over this TCP/IP connection. Customers send and receive SMS messages through this connection. Ozeki SMS gateway implements both the SMPP client protocol and the SMPP server protocol.
How can I become an SMS service provider using an SMPP server?
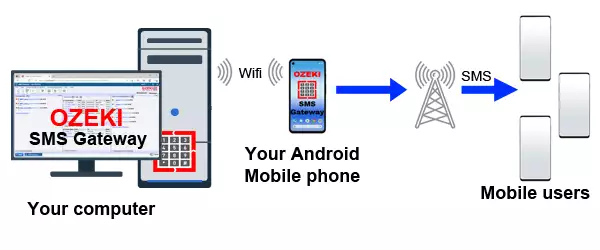
An SMPP server is a software for providing SMS services. To provide SMS service, you need to install the Ozeki SMS Gateway on a Windows or on a Linux computer. It allows you to setup SMPP user accounts and it allows you to accept connections from SMPP clients. Ozeki SMS Gateway is an SMPP server software. If you want to connect your SMPP server to the mobile network instantly, you may setup an Android SMPP server. (Figure 1)
Use cases
An SMPP Server is ideal for lots of simple to complex scenarios. Some of which are:
- Provide SMS service to customers
- Act as a central hub for SMS services
- Provide SMS service for SMS applications
- Provide SMS aggregator service
- SMS routing
- Use as a reporting gateway to keep track of all SMS messages
- Use as a protocol converter (Http to SMPP, UCP to SMPP, CIMD2 to SMPP)
- Forward SMS messages to mobile networks and 3rd party SMS service providers
How to setup an SMPP server?
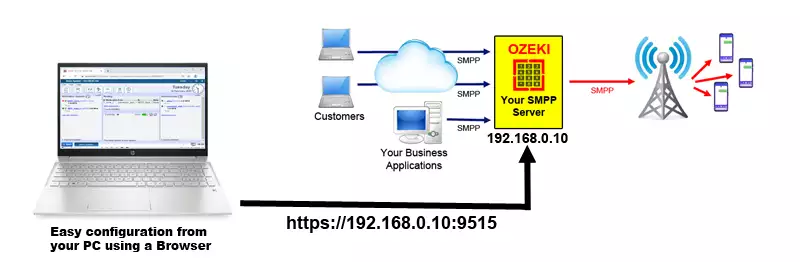
To setup an SMPP server you need to install the Ozeki SMPP gateway and configure an SMPP user. The installation of Ozeki SMPP server is similar to the installation of a standard windows application. The only difference is that you will configure the SMPP server from a web browser by opening an URL (Figure 2). This is a great advantage to traditional Windows applications, because the web-based user interface can be accessed from another PC in your LAN, so you won't have to spend time in the cold server room.
To setup an SMPP server:
- Download the Ozeki SMPP server software
- Install the software on Windows 10
- Create a link to the mobile network
- Configure your firewall to let users in
- Create SMPP user accounts
- Set the SMPP sender ID for each user
- Route outgoing SMS from SMPP users
- Route incoming SMS to SMPP users
- Setup database reporting to log each message
Where can I download the SMPP server from?
Ozeki SMS Gateway is an excellent high-performance SMPP server.
You may download Ozeki SMS Gateway from the
following URL:
https://ozeki-sms-gateway.com/p_727-download-sms-gateway.html.
When you download Ozeki SMS Gateway make sure to select the latest version. On the above download page, you will be presented with a choice of platforms. You may download the SMPP server for Windows, Linux or for your Android Mobile phone.
What is the SMPP server price?
The price of Ozeki SMS Gateway includes the price for the built in SMPP Server and SMPP client protocols. You don't have to pay any extra for this (or any other) protocol. Pricing is determined by the performance of the system. The more messages you wish to send, the higher capacity system you will need to purchase. License prices are based on Messages per Minute (MPM) or Messages per Second (MPS) capacity. The performance ranges from 5 MPM to 1000 MPS. If you are a startup you can start with a lower capacity license and upgrade your license as your capacity demand increases. You may get an instant quotation by filling out the form on the How to buy the SMS gateway page.
Is there an SMPP server free of charge?
You can use the trial of Ozeki SMS Gateway free of charge for a period of 10 days. This period allows you to test the performance and the features without any financial obligations. You may setup the SMPP server on Windows, on Linux or you may even try the Ozeki SMS Gateway for Android version for trial purposes.
Which platforms are supported?
You can operate and SMPP server on Windows, Linux or Android. The choice depends on the number of messages you wish to send and the platform you like to work with. For high performance systems, that support tens of thousands or hundreds of thousands of SMS messages per day, the Windows and Linux editions are recommended. On an Android Mobile phone, the capacity is limited to a few thousand SMS per day. On the other hand, the Android version could be a good option for you, because it gives you instant access to the mobile network wirelessly, which makes sending and receiving messages easy.
SMPP Server on Windows
The most obvious and most common choice is SMPP Server on Microsoft Windows. Windows gives you easy access to your system and it contains all the prerequisites needed straight out of the box. You can simply following the SMS gateway installation steps for Windows to get the basic system up and running. After your system is installed, you may configure SMPP user accounts directly from the home screen by following the steps below. The installation and configuration can be performed in a few minutes time. Windows also contains Microsoft Edge, which is a supported browser for configuration.
One of the reasons we like windows is because Ozeki SMS gateway is based on .NET, which comes built into Windows and is well optimized to run in that environment. In addition to this, windows offers several built in system performance monitoring functionality, that make resource optimization efficient.
SMPP Server on Linux
Many service providers who are familiar with Linux environments choose an SMPP Server on Linux configuration. The reason for this is that Linux computers can be managed from remote locations easily. On linux server, you can configure your SMPP server through the command line. This is very easy if you use base or any other high-end shells. The network configuration options on most Linux systems are also very friendly. On Linux firewall rules are easy to setup and the reliability is also great. If you wish to setup your SMPP server on Linux, follow the instructions in the SMS gateway installation steps for Linux guide. This guide shows you how to do the steps on Ubuntu Linux (the Ubuntu server edition is used). If you use a different Linux distribution, such as RedHat, Debian, Linux Mint, etc the installation steps will be quite similar.
We can state that both Windows and Linux installations will offer high capacity for your SMPP server system and a convenient way to work. Depending on hardware performance both choices can be used to reach speeds of up to 1000 SMS per second if you use Ozeki SMS Gateway.
SMPP Server on Android
If the message capacity you need is only a few thousand messages per day, a good option might be using an Android SMPP server. For example, you can setup the Ozeki Android SMS gateway. The advantage of installing the Ozeki Android SMS Gateway directly to an Android Mobile phone is that you have instant connection to the mobile network. In this case SMS messages will go to the mobile network wirelessly (as opposed to Windows and Linux systems, where SMS is sent through the Internet). The freedom of the wireless connection allows you to use this SMPP server system in more locations. You can use single and dual SIM phones with Android 11 or newer. Wireless mobile network connectivity is a huge plus, because you will not have to worry about wired internet access.
An additional benefit of running the software on Android is that mobile phones have a built in battery, so your SMS gateway on Android will run even if there is a power outage.
How to configure the SMPP server?
After you have installed your SMPP server, you will need to configure it.
Configuration requires three actions. You will first have to connect your
system to the mobile network. After this you will have to configure SMPP
user accounts and finally you have to setup routes to tell the system which
SMS message should go where.
Configuration can be performed using a web browser.
Google Chrome and Microsoft Edge is supported. Using the web browser you have
to connect to your installed SMPP server. The URL to use is
https://localhost:9515
This URL will work if your web browser runs on the same computer where your
SMPP server is installed on. You can also configure it remotely, provided your
open port 9515 and port 9516 on your firewall and you replace the IP address
in the above url to point to your server.
How to connect your SMPP server to the mobile network?
To connect the SMPP server to the mobile network you have various options. You can connect wirelessly the same way as a mobile phone connects. You can connect to the SMSC of a mobile network operator over the Internet using the SMPP, UCP or CIMD2 protocol or you can use an on-line http sms service. In either case it is a good practice to use multiple connections to the mobile network for fault tolerance, load balancing, least cost routing and backup routing purposes. A common solution is to setup an IP sms connection (e.g. SMPP client connection) and a wireless link as a backup using an SMS modem pool.
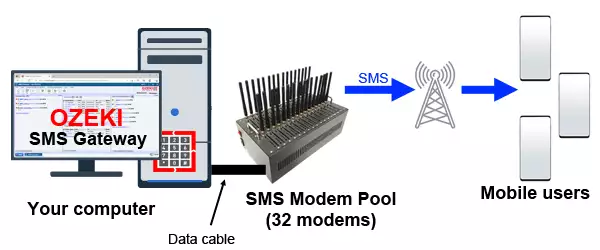
How to connect your SMPP server to the mobile network wirelessly
To connect your SMPP server to the mobile network wirelessly, you will send sms using a GSM modem, or you will send sms using a GSM modem pool or you will use an Android Mobile phone. (Figure 3)
In either case you need SIM cards purchased from a local mobile network operator, and the phone numbers you can use as SMS Sender ID will be the phone numbers assigned to the SIM cards by the network operator. (Figure 4) The advantage to using a wireless connection is that it is easy to setup, and often you can send and receive SMS messages free of charge over wireless links. (In fact, many SMS service providers run a business of purchasing SMS modem pools with SIM cards and they sell the SMS messages and phone numbers to their clients over the Internet by providing an HTTP sms service.)
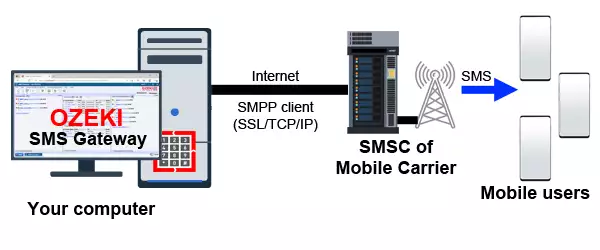
How to connect your SMPP server to a mobile network operator
To send large volumes of SMS messages, a direct connection to the Short Message Service Centre (SMSC) of a mobile network operator, or to a high-capacity on-line SMS service is a good option. Mobile network operators and top SMS providers offer SMPP client connection or another heavy-duty SMS protocols, such as the UCP sms protocol, the CIMD2 sms protocol or the OZX sms protocol. In most cases you can connect to these providers through an secure SSL link. (Figure 5) You may check out the how to create a secure smpp client connection guide on getting more information about this connection option.
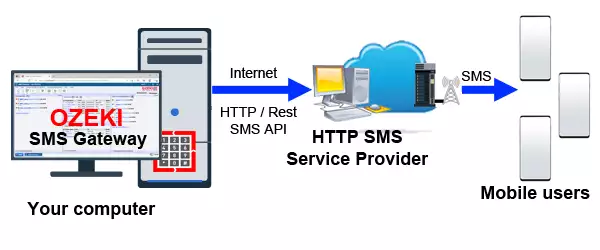
How to connect your SMPP server to an HTTP SMS service provider
The third option to connect your system to the mobile network is to connect to an HTTP SMS service provider. (Figure 6) Although the HTTP protocol is not the most efficient option to send and receive SMS messages, because it puts a large data overhead on each SMS, and it does not support SMS delivery reports and inbound SMS messages properly, it is still used by many businesses. The primary reason for this is that an HTTP SMS connection can be setup very effortlessly.
How to setup an SMPP user account (Video tutorial)?
To see the configuration steps to create an SMPP user account in your SMPP server, and to see how an SMPP client can connect to it, check out the following video. This video will show you where you can enter the SMPP username and the SMPP password for the user account, and how you can use these details in the SMPP client to connect.
To create an smpp user:
- Open a web browser
- Enter the SMPP server's URL (https://localhost:9515)
- Login with the admin username (if prompted)
- In the left panel click on Add new user/application
- Select SMPP user from the list
- Create a username and password
- In the advanced tab turn on logging
- Open the Help tab page for connection information for clients
- Ask your customer to configure their SMPP client software
- Check the logs and see the SMPP client connect
It is also worth mentioning that in the above video we have used another Ozeki SMS gateway to connect as an SMPP client. We could do this because Ozeki SMS gateway can act as both an SMPP client and as an SMPP server. You can learn more about the SMPP client configuration in the SMPP client setup guide.
How to create a an SMPP user account in the SMPP server
To video above shows you how to setup a basic SMPP user account in your SMPP server. The Ozeki SMS Gateway installation procedure will automatically open the configuration page in the default browser. If you default browser is not Google Chrome or Microsoft Edge, we recommend that you switch to one of them, to get optimal experience.
Creating SMPP user accounts is important, because you need to authenticate the users and applications who will connect to your service. You can use this authentication information for billing and accounting purposes if you setup database reporting for SMS traffic.
You can create an SMPP server user account by clicking on the Add new user/application link in the right-hand panel (Figure 7), and selecting the SMPP user option (Figure 8)

After clicking on the Add new user/application link you will be presented with a list of options. Select SMPP user by clicking on the install link. (Figure 8)

After clicking on install, you will see the configuration form of the SMPP user account. You need to provide the Username and the Password on this form (Figure 9). You may also turn on SMPP logging in the Advanced tab page of the form.

Finally, after creating the SMPP user account, the system will take you to the details page of the newly created SMPP user. On this page you can see the communication log, the message queues, the message speed measured in Messages per Minute (MPM) and you can change the configuration. A great tool on this page can be found in the Protocol Data Unit (PDU) Decoder tab page (Figure 10). The PDU decoder allows you to understand how an SMPP pdu is created. You may simply copy an SMPP PDU from the events panel into the PDU decoder form, and you will be presented with a detailed analysis of the PDU.

How to setup an SMPP client on a different computer to connect to the SMPP server
Once you have created your SMPP user account, you are ready to accept SMPP client connections in your SMPP server. To test this functionality, we recommend that you install another copy of Ozeki SMS gateway on a different computer, and configure it as an SMPP client. You may find detailed instructions on how to install and configure an SMPP Client connection for SMS messaging using the Ozeki SMS Gateway software in the SMPP client setup guide.
When you configure your SMPP client you will need to enter 4 mandatory parameters: the host name and the port where the SMPP server is running and the SMPP username and the SMPP password. The SMPP username is called System ID in some SMPP clients. To find out these parameters, you need to open the Help tab on the details page of the corresponding user of your SMPP Server (Figure 11).

Send your first test SMS to your SMPP server
The final step is to send your first SMS message from your SMPP client to your SMPP server. This is the most exciting step. It is best to enable SMPP logging in both the SMPP client and in the SMPP Server's user account to see that communication taking place during this step. To send the message you need to open the details page of the SMPP client connection and click on Send on the Test tab. After the test is sent you can check the logs (Figure 12).

Advanced SMPP user authentication
Once your SMPP server is up and running, you may go to the next step and automate manual process, such as user creation. If you decide to authenticate users automatically, you have several options. In the example above the user authentication was done using the username and password that was entered manual (when the SMPP user account was created). Ozeki provides other ways of authenticating SMPP clients: you can authenticate users using user information stored in a database table, or you can authenticate SMPP users using user information stored on an LDAP server such as Microsoft Active directory. This option is often used in enterprise environments, where the login details are already available in the LDAP directory. You may also configure Ozeki to issue HTTP requests and ask if a username/password is valid. This method is called SMPP user authentication using HTTP requests. In all of these cases the SMPP user will be created automatically on the first successful authentication attempt.
Assigning credits to SMPP users
SMS messages cost money. If you operate a pre-paid SMS service, or you simply want to be on the safe side, it is a good idea to setup credits for your SMPP user account. This allows you to set a maximum limit for an SMPP user, to limit the number of messages he can send in a day/week/fortnight/month. Credit limits can be adjusted automatically, or you can add/remove credit manually. If an SMPP user sends an SMS a single credit is deducted from his balance. If he sends a multipart message, for example a message containing 3 SMS parts, 3 credits will be used. This credit system allows you to control your users and keep your system safe from building up unexpected costs.
Limiting capacity for SMPP users
If you are an SMS service provider, you might want to protect your system from overload, or you might simply want to charge your users based on purchased message capacity. Ozeki SMS gateway gives you the option to limit SMPP speed to a configured Messages per Minute (MPM) or Messages per Second (MPS) rate. You can set different SMPP speed limits for different SMPP user accounts. If the user exceeds its allowed speed quota, the system will return SMPP throttling error messages. This will allow the user to adjust the outgoing speed of his SMPP client's connection.
Picking a random Sender ID for SMPP users
SMS service providers usually operate a pool of phone numbers. Some customers will want to use random Sender IDs for their outgoing messages to avoid SPAM detection or blocking. The following page gives you information on how to configure a random sender ID for SMPP sms connections. In short there are two options. You can use the routing table of Ozeki SMS gateway, and modify the SMS messages on the fly, or you may set the sender IDs in the configuration form of the SMPP user.
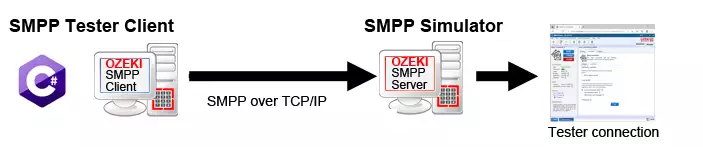
How to test your SMPP service
If you have setup an SMPP service, you can test it by setting up an SMPP simulator (Figure 13) on a different computer. You can use this simulator do some SMPP performance testing, or to simulate simple scenarios, such as: Successful SMS delivery, Failed SMS delivery, Successful SMS delivery report, SMS delivery failure report, SMPP server failure, Invalid SMPP username/password, SMPP throttling error.
Testing your SMPP service is very important, because you need to be certain that your system behaves properly in different conditions. Without using an SMPP simulator there is no way of performing tests that simulate extreme situations, and it is not possible to develop reliable well tested SMS solutions.