
Kannel SQLBox Alternative: How to migrate SQL sms from Kannel to Ozeki
This guide explains how to migrate database-driven SMS sending from Kannel SQLBox to Ozeki SMS Gateway. It shows how to review the existing Kannel tables and workflow, configure an Ozeki SQL user, create the required Ozeki message tables, and update your application to submit messages through ozekimessageout while monitoring delivery status directly in the database.
How to plan the migration from Kannel SQLBox to Ozeki
Start the migration by reviewing the current Kannel SQLBox setup and the database workflow your applications depend on. Identify every application, SQL job, and integration that inserts records into the send_sms table. Plan a parallel-running phase in which Kannel and Ozeki operate side by side, so you can validate Ozeki without interrupting production SMS traffic.
How to configure Kannel SQLBox
The SQLBox component acts as the database interface of the existing Kannel SMS sending workflow. In this phase you will review the SQLBox configuration, the send_sms and sent_sms tables, and the SMPP connection used for delivery. Document these settings carefully, because the same workflow will be reproduced later with Ozeki's built-in SQL user.
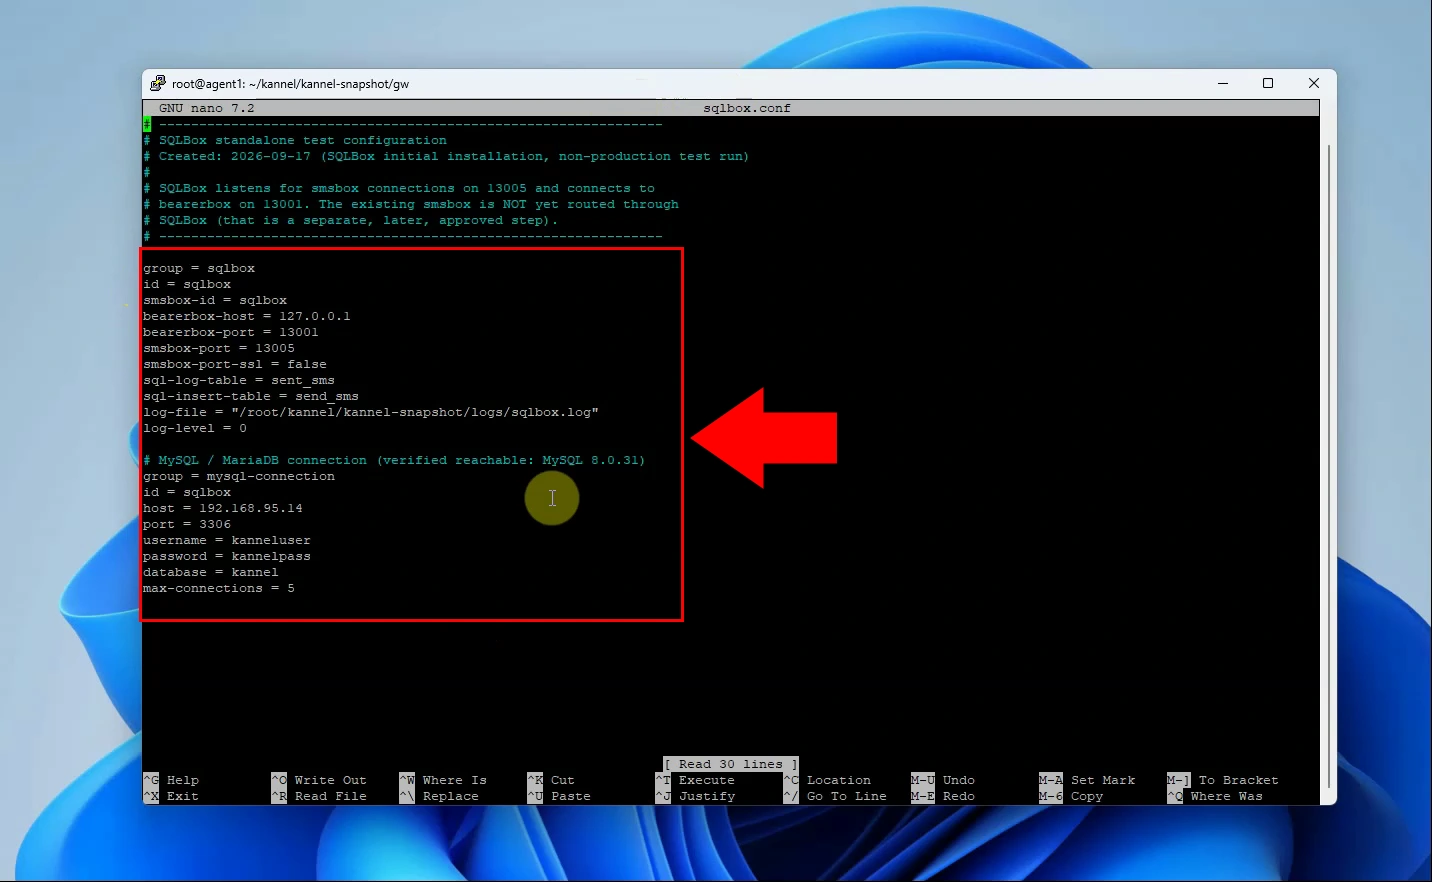
Configure SQLBox with the bearerbox and smsbox connection details, then define the SQL insert and sent-message tables. Add the MySQL/MariaDB connection settings so SQLBox can read queued messages and record sent messages. Verify database connectivity and ensure the SQLBox service is running before starting the migration.
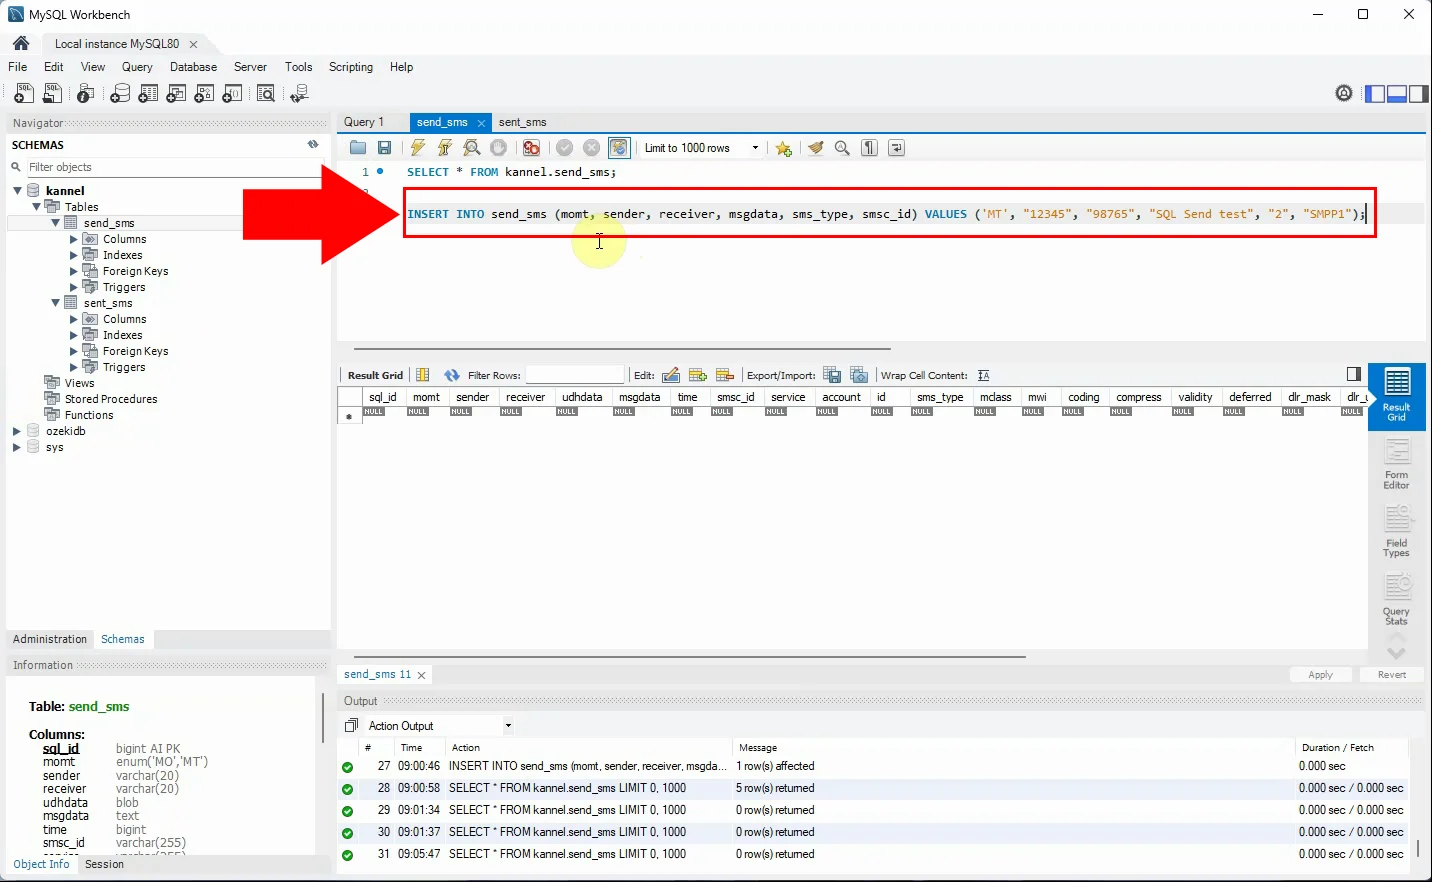
Insert a test SMS record into Kannel's send_sms table using the existing application or a direct SQL query. SQLBox detects the new row and submits the message through the configured Kannel SMS infrastructure. Use this step to document the current sender, recipient, message, and status-handling workflow.
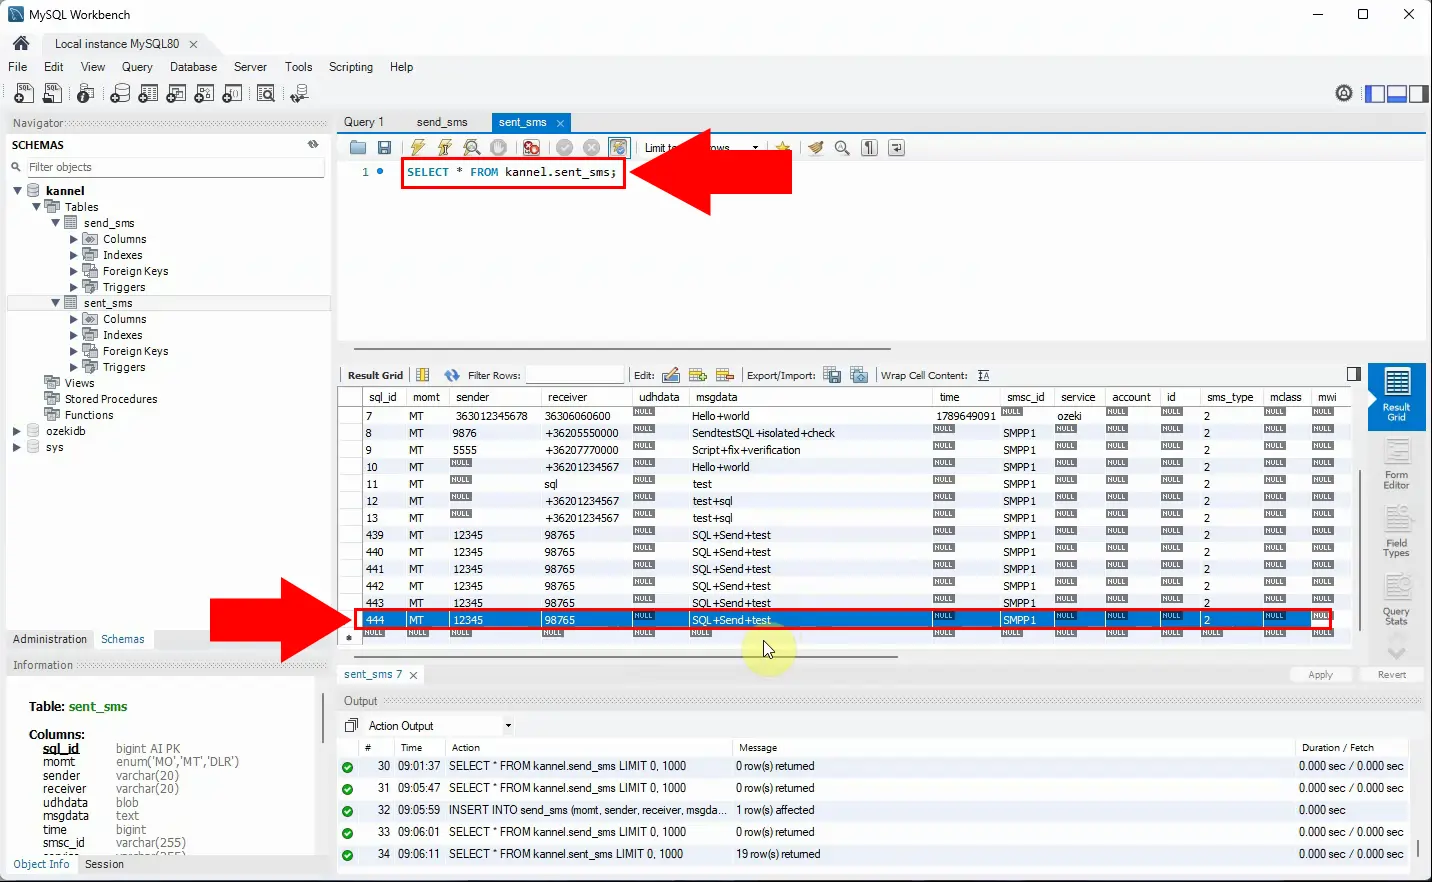
After Kannel processes the queued message, confirm that SQLBox moves or logs it in the sent_sms table. Check that the stored values provide the audit information your application requires after migration. This establishes the current database-driven sending behavior that Ozeki will replace.
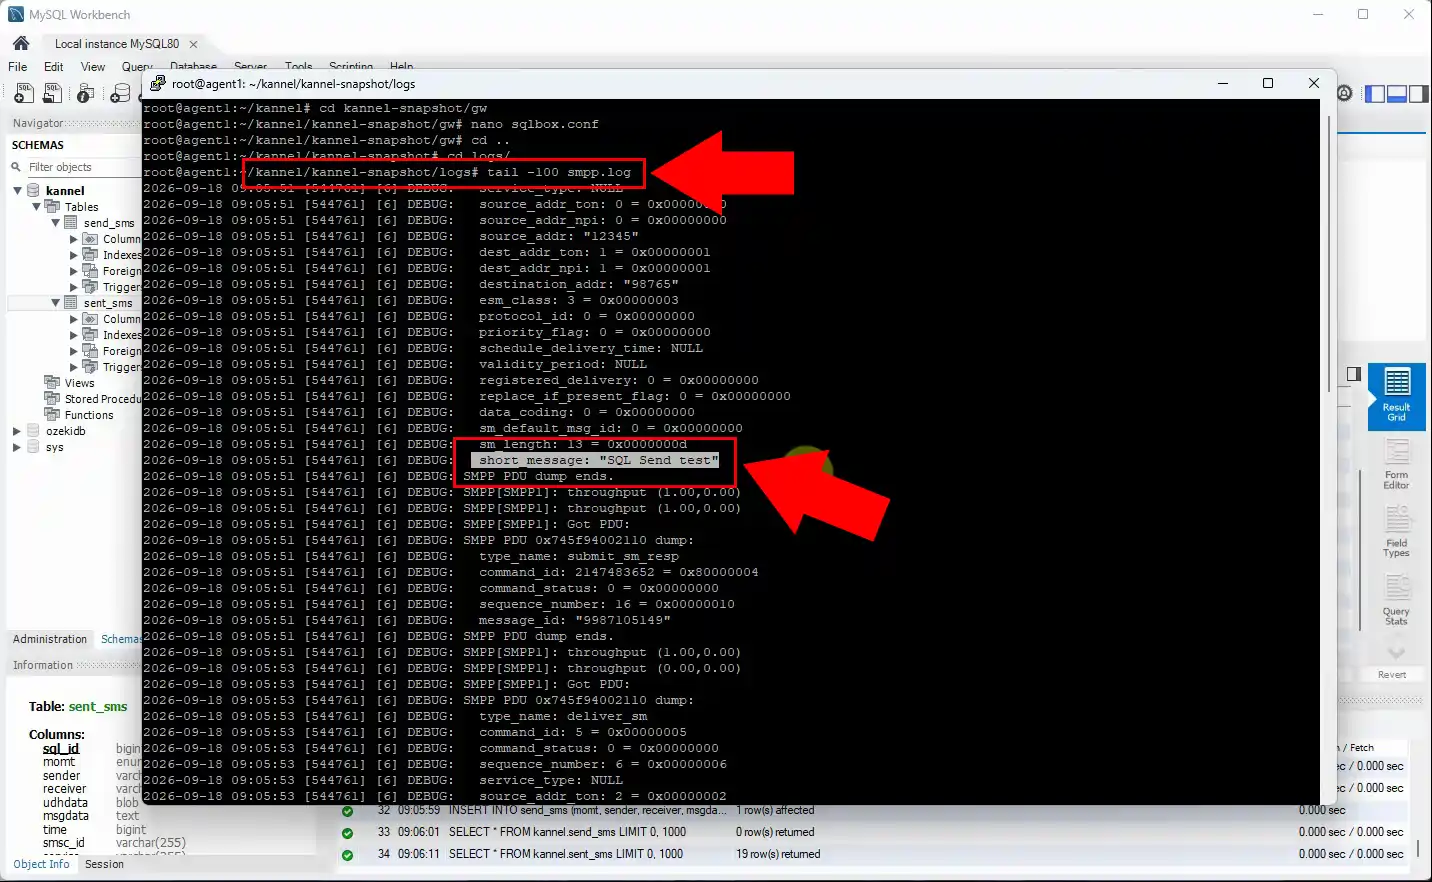
Confirm that the message submitted by SQLBox is delivered to the configured SMPP connection. Review Kannel and SMPP logs for acceptance, delivery-report, and error information before switching systems. Resolve any existing routing or connectivity issues so they are not carried into the Ozeki deployment.
Kannel SQL Box config:
group = sqlbox
id = sqlbox
smsbox-id = sqlbox
bearerbox-host = 127.0.0.1
bearerbox-port = 13001
smsbox-port = 13005
smsbox-port-ssl = false
sql-log-table = sent_sms
sql-insert-table = send_sms
log-file = "/root/kannel/kannel-snapshot/logs/sqlbox.log"
log-level = 0

# MySQL / MariaDB connection (verified reachable: MySQL 8.0.31)
group = mysql-connection
id = sqlbox
host = 192.168.95.14
port = 3306
username = kanneluser
password = kannelpass
database = kannel
max-connections = 5
How to configure Ozeki SMS Gateway SQL user
The SQL user is Ozeki's replacement for the standalone Kannel SQLBox component. It polls the ozekimessageout table for outgoing messages and writes delivery status information back to the database. The following steps show how to install the SQL user, connect it to your database server, and create the required message tables.
In Ozeki SMS Gateway, install an SQL user to enable database-based SMS submission and status updates. This user replaces the separate Kannel SQLBox component by handling database polling directly in the gateway. Assign a clear user name and configure it alongside the SMS service connection that will send the messages.
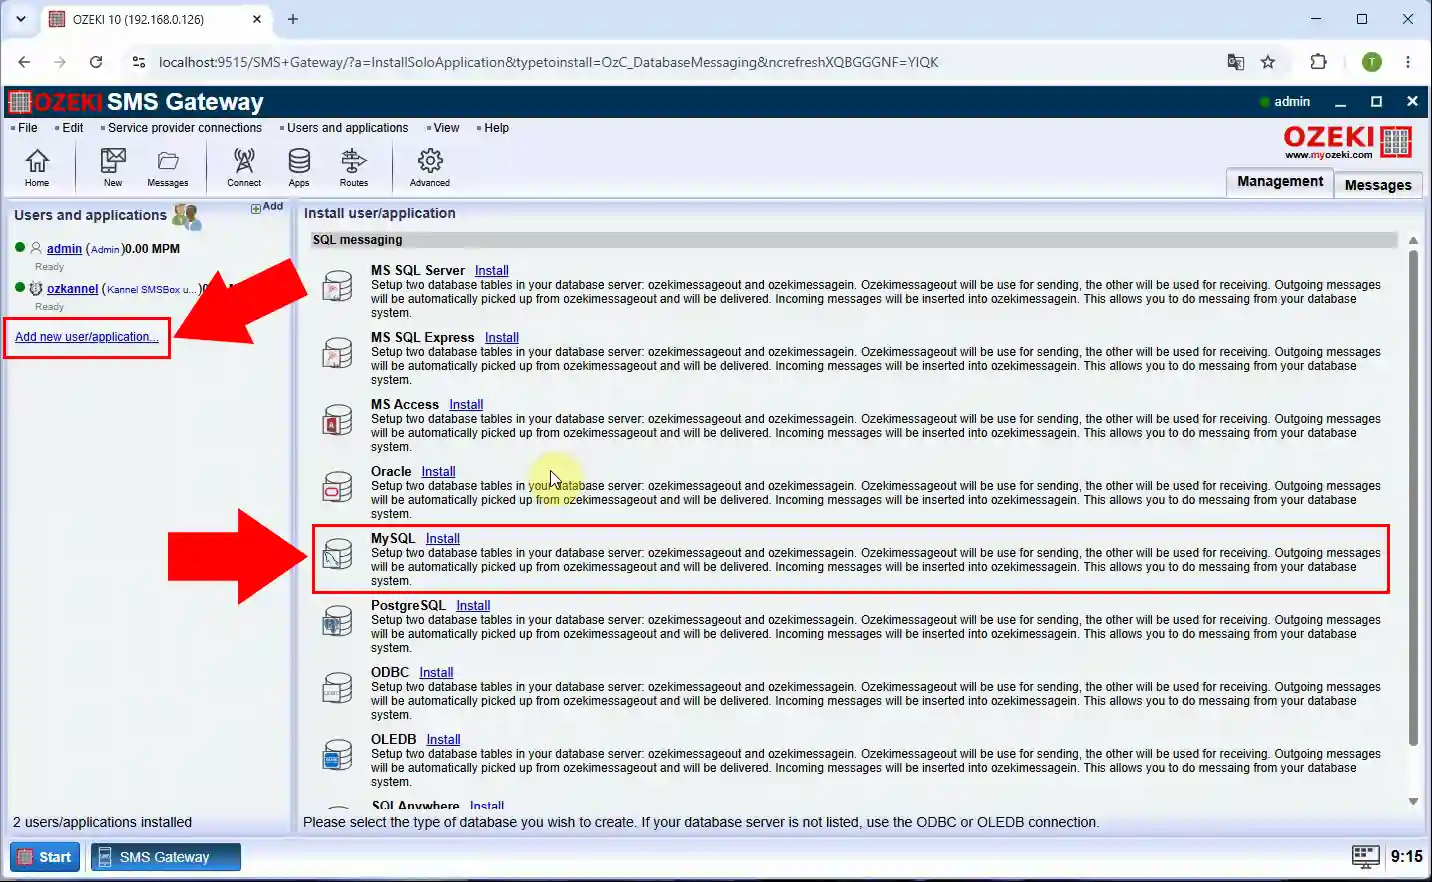
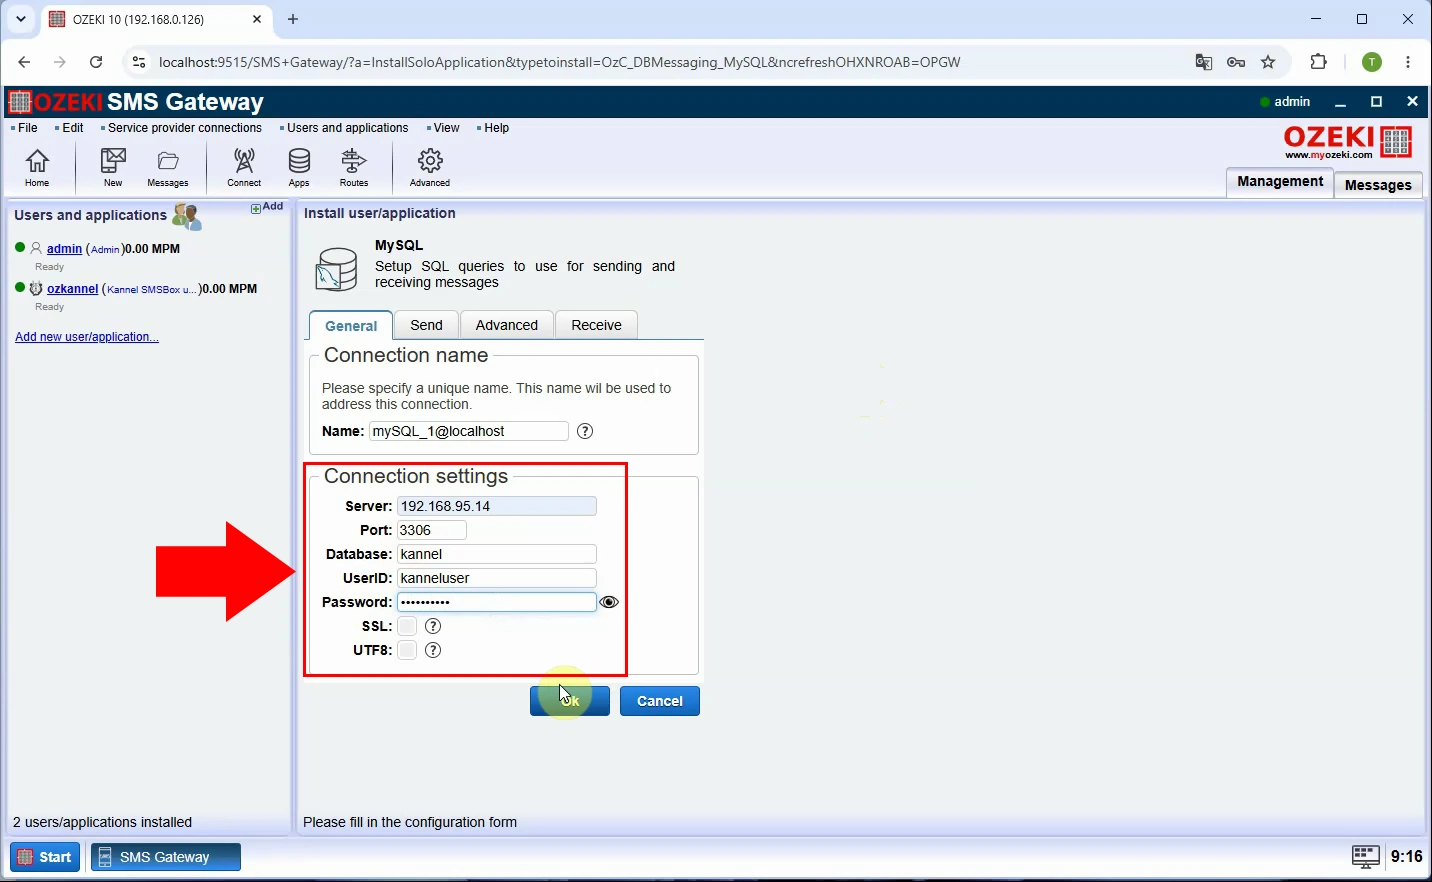
Configure the SQL user with the database server address, port, database name, and dedicated credentials. Use an account with only the permissions required to read outgoing rows and update message statuses. Test the connection from Ozeki before creating tables or redirecting production application traffic.
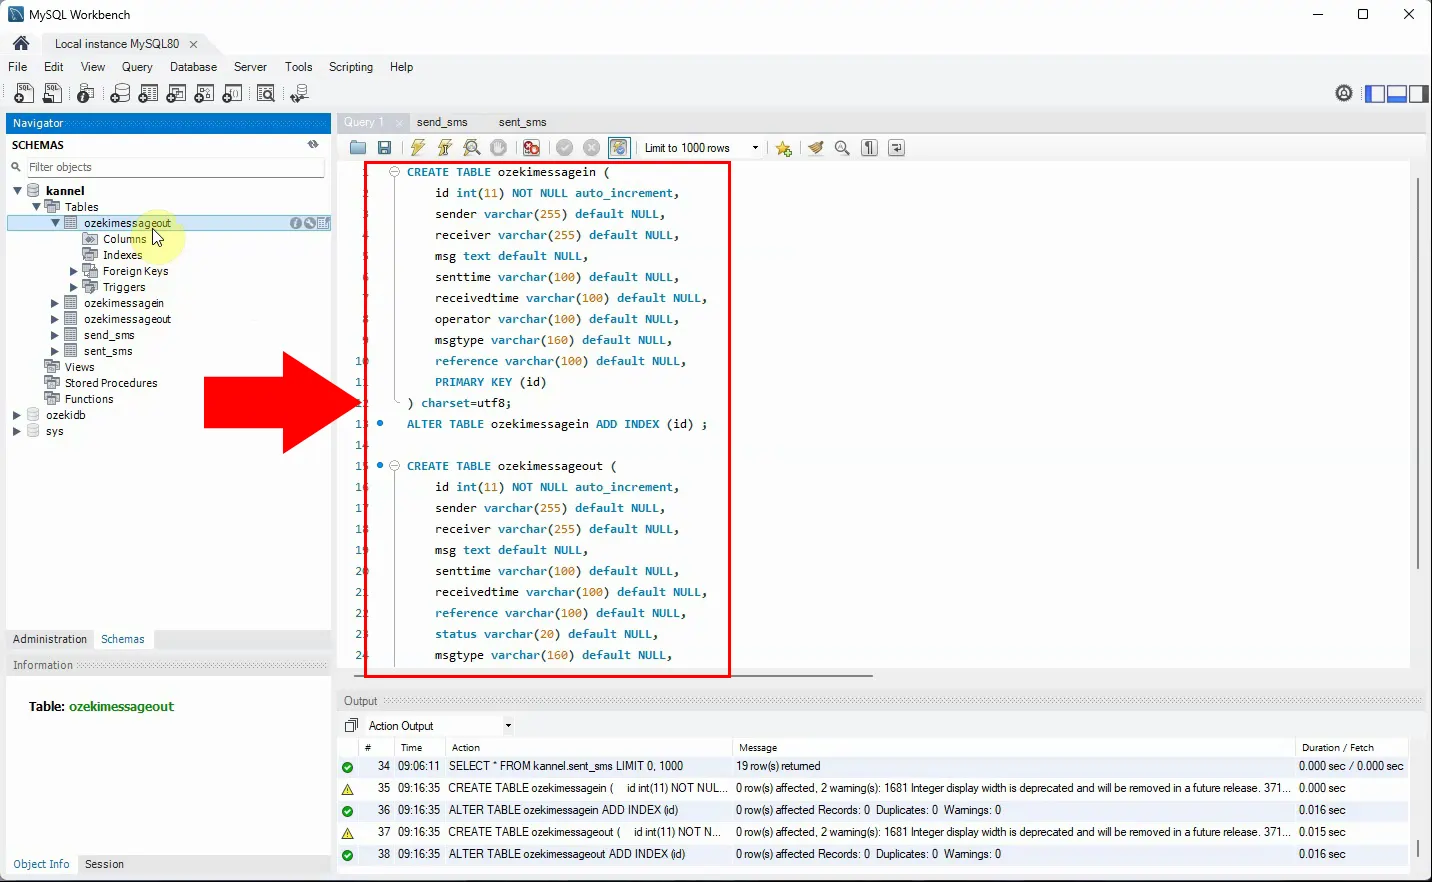
Create the Ozeki ozekimessageout and ozekimessagein tables in the target database using the published schema. The outgoing table stores SMS submission fields, delivery status, operator data, and error messages. Preserve the primary-key index and UTF-8 character set to support efficient processing and non-ASCII message text.
Update the application, integration, or SQL job to insert outgoing SMS messages into ozekimessageout. Populate at least the sender, receiver, message text, and any required reference or message-type fields. Run initial tests with a small controlled batch before redirecting all traffic from Kannel.
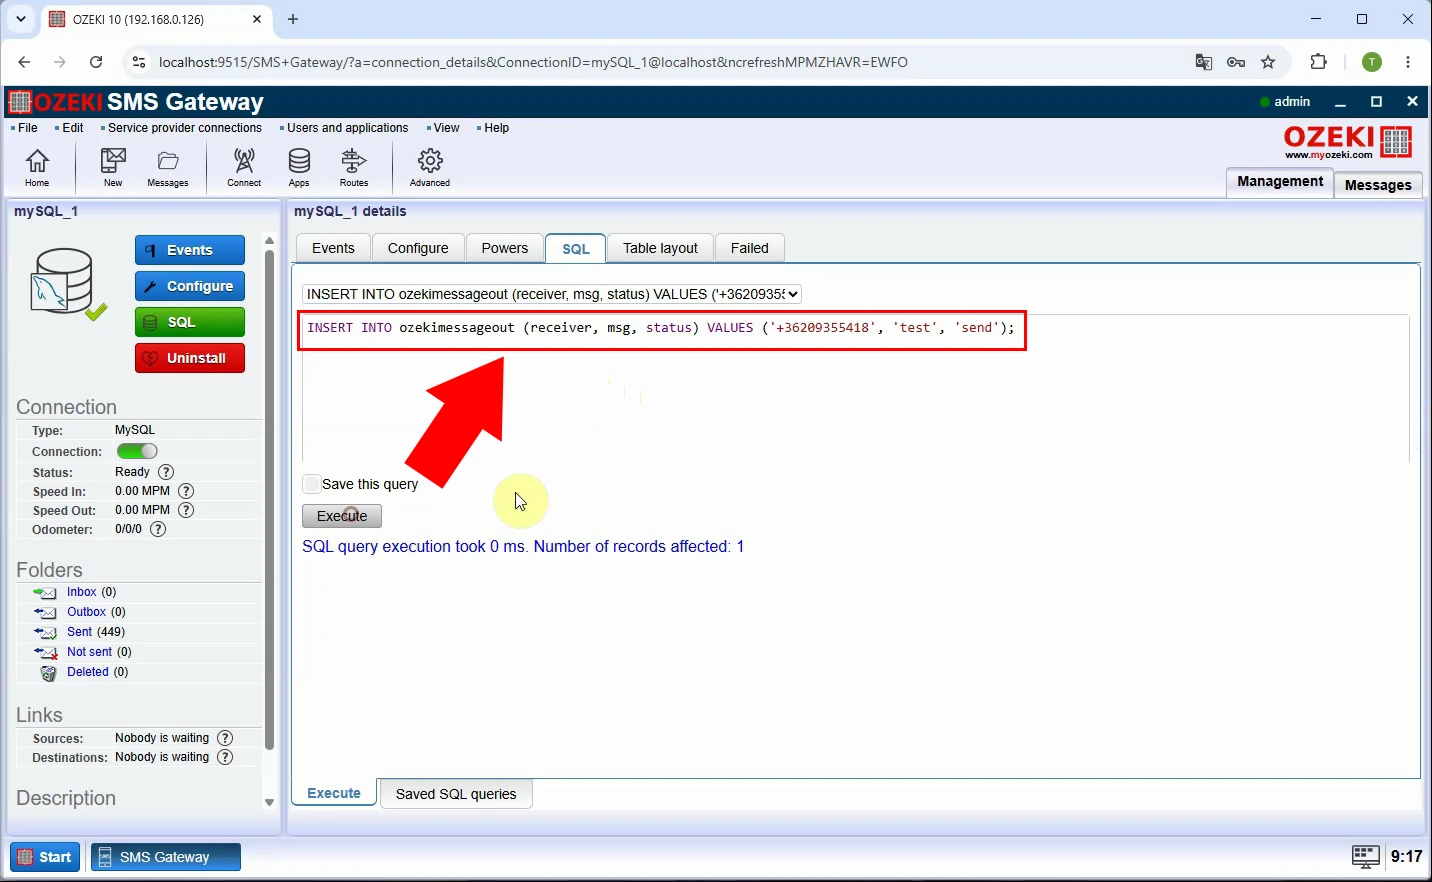
Verify that each submitted SMS appears correctly in ozekimessageout and that field values match the intended message. Confirm phone-number formatting, character encoding, sender identity, and application reference values. Ozeki reads these records and forwards them through its configured SMS connection.
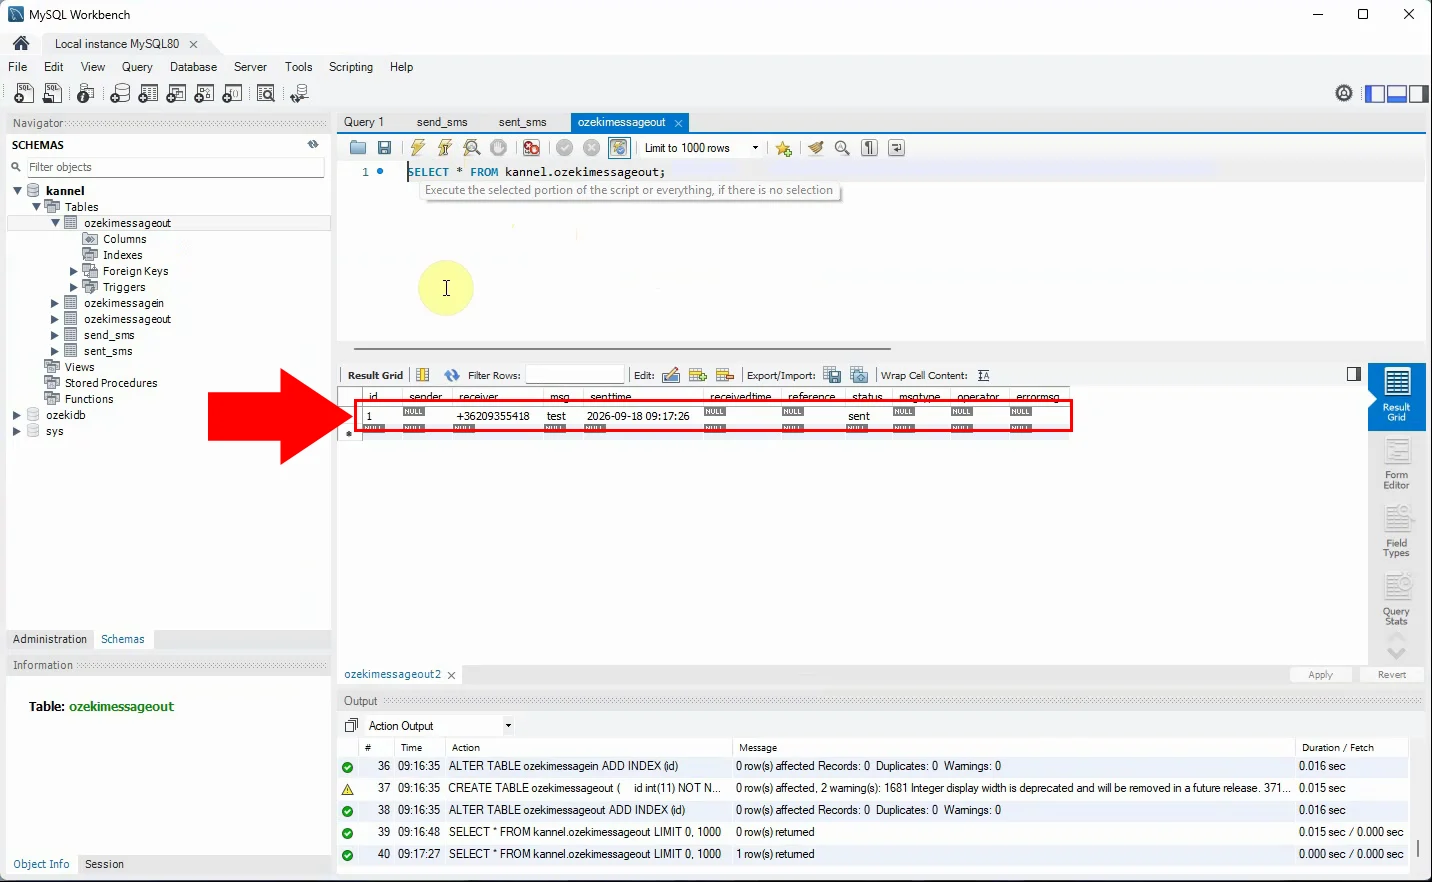
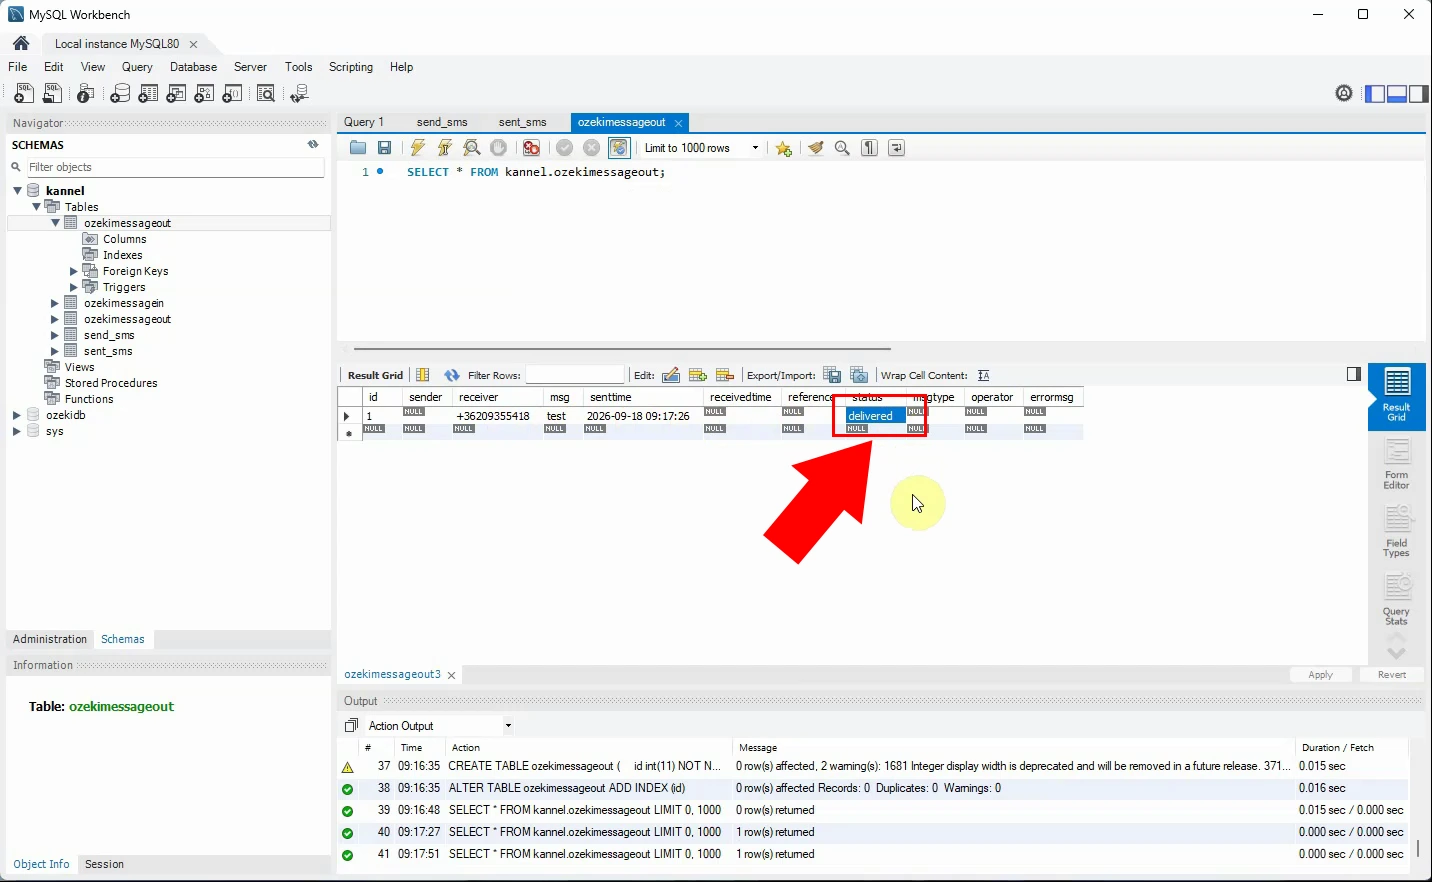
After Ozeki submits and receives delivery information for a message, check the updated status, receivedtime, operator, and errormsg fields. Use these fields to adapt reports or application logic that previously relied on Kannel's sent_sms data. Keep Kannel available during validation, then retire SQLBox after Ozeki's database sending and delivery-status flow has been confirmed.
Ozeki SQL table layout
The SQL user works with two tables: ozekimessageout for outgoing messages and ozekimessagein for incoming messages. The SQL statements below create both tables with the fields Ozeki uses to store message content, status, and delivery information. Run these statements in your MySQL or MariaDB database before you connect the SQL user to it.
CREATE TABLE ozekimessagein (
    id int(11) NOT NULL auto_increment,
    sender varchar(255) default NULL,
    receiver varchar(255) default NULL,
    msg text default NULL,
    senttime varchar(100) default NULL,
    receivedtime varchar(100) default NULL,
    operator varchar(100) default NULL,
    msgtype varchar(160) default NULL,
    reference varchar(100) default NULL,
    PRIMARY KEY (id)
) charset=utf8;
ALTER TABLE ozekimessagein ADD INDEX (id) ;

CREATE TABLE ozekimessageout (
    id int(11) NOT NULL auto_increment,
    sender varchar(255) default NULL,
    receiver varchar(255) default NULL,
    msg text default NULL,
    senttime varchar(100) default NULL,
    receivedtime varchar(100) default NULL,
    reference varchar(100) default NULL,
    status varchar(20) default NULL,
    msgtype varchar(160) default NULL,
    operator varchar(100) default NULL,
    errormsg varchar(250) default NULL,
    PRIMARY KEY (id)
) charset=utf8;
ALTER TABLE ozekimessageout ADD INDEX (id);
How to verify the migration and switch over to Ozeki
Send controlled test messages through Ozeki and compare the results with the behavior of your Kannel SQLBox setup. Check the status, senttime, receivedtime, operator, and errormsg fields in ozekimessageout to confirm that delivery reporting works end to end. Once the parallel-running phase is successful, redirect all application traffic to Ozeki and retire the SQLBox service.
Conclusion
This migration consolidates the database-driven SMS workflow into a single gateway component. Your application keeps submitting messages through a database table, while delivery status, timestamps, and error details stay available for reporting. The result is a simpler architecture that provides the same audit visibility the Kannel sent_sms table used to offer.
By following the steps in this guide, you have replaced the standalone Kannel SQLBox component with Ozeki SMS Gateway's built-in SQL user, achieving the same database-driven SMS workflow with fewer components to maintain. Your application now submits outgoing messages through the ozekimessageout table, while delivery status, timestamps, operator information, and error messages are recorded directly in the database, giving you the same audit visibility that sent_sms previously provided. With phone-number formatting, character encoding, and delivery reporting verified during the parallel-running phase, you can confidently retire SQLBox and rely on Ozeki SMS Gateway for stable, transparent SMS sending and status tracking going forward.